Every year across Australia, thousands of homeowners and weekend builders spend thousands of dollars on packs of kiln-dried Merbau, screw down a gorgeous timber deck, and celebrate on Sunday evening with a barbecue. Six months later, the deck is either cupping like a row of canoes or has massive 10mm gaps where dirt, leaves, and sunglasses disappear forever.
Ask three different people at the trade counter what size gap between Merbau decking boards is best, and you will get three completely different answers. The most common advice tossed around is: "Just chuck a 5mm spacer between every board and you'll be sweet, mate."
Following that blanket 5mm rule without considering your board width, timber moisture content, or subfloor ventilation is exactly why so many decks fail. Here is how timber physics actually works on Australian job sites, and the exact millimetre spacing you need to measure before driving your first screw.
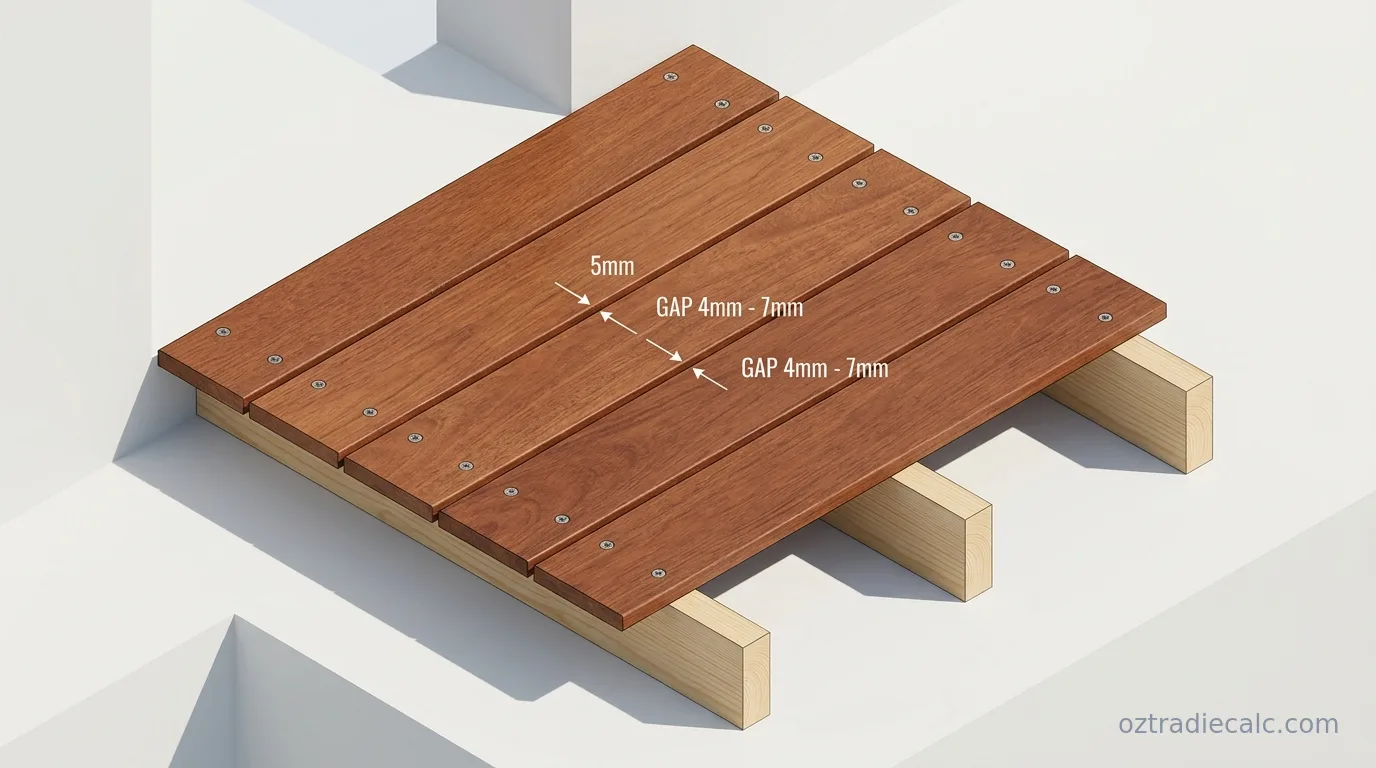
1. The "Standard 5mm" Fallacy: Why One Size Fails
Wood is a natural, hygroscopic material. It breathes moisture in and out continuously to match the relative humidity of the surrounding air. When timber absorbs moisture during wet winter months, it expands across its width. When the blazing Australian summer sun bakes the deck at 38°C, it loses moisture and shrinks.
If you lay a 140mm wide board with a tight 4mm gap on a dry 35°C day in January, what happens when two weeks of non-stop July rain hit? That 140mm board can easily expand by 4mm to 6mm. With nowhere left to expand sideways, the boards crash into each other, crush their edges, and pop their screws clean out of the joists in a structural failure known as deck tenting.
Conversely, if you lay unseasoned or damp timber with a 6mm gap during winter, that same timber will shrink by 5% to 7% as it dries out in summer. Your 6mm gap quickly turns into an unsightly 11mm chasm.
2. Merbau Decking Sizes & Treatment: Is It Chemically Treated?
A very common question asked at hardware yards is: "Are Merbau decking boards chemically treated like pine?"
The answer is no. Unlike softwoods (such as Radiata pine which requires chemical H3 or H4 pressure treatment to prevent rot), Merbau is a naturally durable Class 1 above-ground hardwood (Intsia bijuga). Its extreme density (~850–900 kg/m³) and high natural concentration of protective tannins give it inherent resistance to termites and fungal decay without any chemical treatment.
In Australia, Merbau decking boards are sold in three standard pencil-round dressed profiles:
- 70 × 19mm: Narrow profile, often chosen for small verandahs, screens, and tight decorative borders.
- 90 × 19mm: The most popular standard Australian residential deck profile. Highly stable and forgiving.
- 140 × 19mm: Wide-board architectural profile. Gives a modern, expansive look but experiences twice the cross-grain movement of 90mm timber.
3. What Size Gap Between Merbau Decking Boards? (Decision Matrix)
To determine what size gap between Merbau decking boards you should leave, match your board profile (90mm vs 140mm) with your timber moisture condition (Kiln-Dried vs Unseasoned).
| Board Profile | Moisture State | Installation Season / Weather | Recommended Gap | Why This Spacing Works |
|---|---|---|---|---|
| 90 × 19mm | Kiln-Dried (KD 10–14% MC) | Hot / Dry Summer Day | 5mm | Allows up to 2.5mm of winter wet-weather swelling without touching. |
| 90 × 19mm | Kiln-Dried (KD 10–14% MC) | Cool / Wet Winter Month | 4mm | Timber is already near peak expansion; will shrink to ~5.5mm in dry heat. |
| 90 × 19mm | Unseasoned / Wet Off-Saw | Any Season | 3mm | Timber will shrink significantly (3–4mm) as it cures to ambient equilibrium. |
| 140 × 19mm | Kiln-Dried (KD 10–14% MC) | Hot / Dry Summer Day | 6mm – 7mm | Wide boards experience double the total dimensional movement of 90mm boards. |
| 140 × 19mm | Kiln-Dried (KD 10–14% MC) | Cool / Wet Winter Month | 5mm – 6mm | Prevents crushing while keeping summer shrinkage gaps under 8mm. |
| 140 × 19mm | Unseasoned / Wet Off-Saw | Any Season | 4mm | High initial shrinkage will widen the gap to 7–8mm over the first 6 months. |
Before ordering your materials, make sure you take accurate dimensions of your framing footprint. You can run your deck dimensions through our Decking Calculator to verify total lineal metres, board counts, and required fastener quantities.
4. Kiln-Dried vs Wet Timber: How Wide Merbau Moves
Merbau has impressive natural fire resistance (up to BAL-29 rating under AS 3959) and remarkable dimensional stability compared to most exterior timbers.
However, timber expands tangentially across the grain far more than it moves along its length:
1. Tangential Shrinkage Rate of Merbau (~2.5% to 3.0%)
For every 1% change in moisture content below the fiber saturation point (~25% MC), Merbau moves approximately 0.25% to 0.30% in width. Along its length, longitudinal movement is virtually zero (less than 0.1%).
2. Why 140mm Wide Boards Need Extra Respect
A 3% width change on a 90mm board equates to roughly 2.7mm of movement. But on a 140mm wide board, that same 3% swing produces 4.2mm of movement per board.
This is why 140mm decking boards require wider initial gaps and double-screwing with minimum 10G or 12G screws to prevent the boards from cupping across their wider face.
The Acclimatisation Rule: Never install Merbau the minute it comes off the delivery truck. Strip-stack the boards on site under cover with timber gluts separating each layer for at least 7 to 14 days so the timber equalises with your local ambient moisture.
5. Low-to-Ground Decks & Subfloor Moisture Traps
If your deck is built low to the ground (ground clearance under 300mm), spacing is even more critical than on an elevated verandah.
On low-level decks built over natural soil or concrete slabs, moisture evaporates from the ground and becomes trapped underneath the subfloor framing. The bottom face of the decking board is constantly exposed to 90% relative humidity, while the top face is exposed to hot, dry sun.
This moisture imbalance creates severe differential swelling: the bottom expands while the top shrinks, forcing the board edges to curl upward in a defect called cupping.
When building low-level decks, follow these critical subfloor rules:
- Add 1mm to your standard gap: For a 90mm board on a low deck, use a 5mm to 6mm gap instead of 4mm to allow moisture to escape between the boards.
- Install Joist Protection Tape: Apply black butyl or bitumen joist tape across the top of all subfloor joists to stop moisture sitting between the joist and the decking board.
- Ground Vapor Barrier: Lay 200-micron builder’s plastic sheeting weighed down with gravel over bare soil beneath the deck to stop ground water vapor from rising.
6. Butt Joints, Wall Gaps & Perimeter Spacings
Side-to-side board spacing is only part of the equation. Leaving incorrect gaps at end joins and perimeter walls will cause localized timber rot and structural binding.
| Location | Required Gap | Critical Reason |
|---|---|---|
| End-to-End Butt Joints | 1.5mm – 2.0mm | Allows end-grain drainage and prevents water trapping that initiates fungal rot. |
| House Wall / Brickwork | 10mm – 12mm | Prevents deck framing and boards from pushing into exterior cladding during building settlement. |
| Fascia / Picture Frame Border | 5mm – 6mm | Maintains uniform airflow and water run-off along perimeter breaker boards. |
| Post Penetrations | 6mm – 8mm | Prevents water pooling around verandah and fence posts. |
7. How to Lay Merbau Decking: Spacers vs Nails vs Clamps
Learning how to lay Merbau decking boards with laser-straight alignment requires consistent spacing tools. Eyeballing gaps board-by-board always results in an unsightly wave pattern by row 10.
Method 1: Purpose-Built Plastic Decking Spacers
Plastic wedge or T-spacers (available in 3mm, 4mm, 5mm, and 6mm) are the cleanest option. Their cross or wedge shape prevents them from falling through the joists, and their smooth sides will not bruise or crush the edges of your Merbau boards.
Method 2: The Framing Nail Gauge Trick
If you run out of spacers on site, standard bright framing nails provide accurate gauges:
- 75mm × 3.06mm framing nail = exact 3mm spacer for green timber.
- 90mm × 3.75mm framing nail = ~4mm spacer for 90mm KD boards.
- Two 10G screws side-by-side = ~5.5mm spacer for 140mm boards.
Method 3: Straightening Bowed Boards
Hardwood boards are rarely 100% straight out of the pack. When laying boards, pull bowed timber into uniform alignment before driving your screws using a specialized Bowrench, a heavy-duty quick-grip clamp, or leverage a chisel driven into the joist face against a scrap block.
8. Fixing Merbau Decking Boards: Pre-Drilling, Edge Distances & Screws
Fixing Merbau decking boards requires proper screw selection and edge distances. Driving 10G or 12G decking screws directly into un-drilled hardwood ends will instantly split the timber or snap the screw shank off inside the joist.
1. Always Pre-Drill and Countersink
Use a dedicated combination drill bit and countersink tool (such as a Smart-Bit) matched to your screw gauge. Set the stop collar depth so the screw head sits 0.5mm to 1.0mm below the surface—never overdrive screws deep into the board, as this creates water holding cups that cause local rotting.
2. Maintain Minimum Edge and End Distances
Under AS 1684.2 framing provisions:
- Maintain at least 15mm to 20mm distance from the side edges of the board.
- Maintain at least 20mm to 25mm distance from the end cut of the board to prevent end-grain splits.
- Fix with two screws per joist crossing on both 90mm and 140mm boards. Single fixing through the center will result in severe board cupping.
3. Screw Grade Requirements
Always use minimum Grade 304 Stainless Steel or Class 3 galvanised 10G × 50mm / 10G × 65mm decking screws. If building within 1km of the Australian coastline or around saltwater swimming pools, Marine Grade 316 Stainless Steel is strictly mandatory to prevent corrosion from salt spray and Merbau's acidic natural tannins.
If you are constructing borders, angled steps, or 45-degree corner joints, you can use our Mitre Angle Calculator to find exact miter and bevel settings for your drop saw.
9. Chippy’s Pre-Screwing Checklist
Before you begin securing your boards across the subfloor, run through this quick on-site quality check:
- Moisture Check: Are the boards kiln-dried (10–14% MC) or unseasoned? (Adjust spacer size accordingly).
- Subfloor Joist Spacing: For 19mm Merbau, joists must be spaced at a maximum of 450mm centres (or 400mm centres for high-traffic or commercial decks).
- Alignment Gauge: Every 4 to 5 rows, pull a string line or measure back to the house wall at both ends to ensure your board runs remain parallel and square.
- Tannin Washing: Merbau bleeds rich red water-soluble tannins when wet. Ensure concrete footings, brickwork, and porous pavers underneath or adjacent to the deck are protected with plastic sheeting before the first wash down.