Few things on a residential job site create more frustration than a private building certifier pulling out a tape measure on final handover and slapping a non-compliance defect notice on your brand-new staircase. You might have framed a rock-solid timber deck or finished a pristine internal hardwood flight, but if the bottom riser measures 155 mm while the rest sit at 180 mm after tiling, or if your step geometry trips the certifier’s digital gauge, the entire flight must be ripped out and rebuilt.
Stair building is unforgiving. Unlike wall framing or subfloor joists where a 5 mm tolerance can easily be packed or trimmed, stairs interact directly with human muscle memory. When walking up a flight in the dark, your brain expects every single step to sit at the exact same millimetre height. If a riser varies by just 6 mm, people trip and fall.
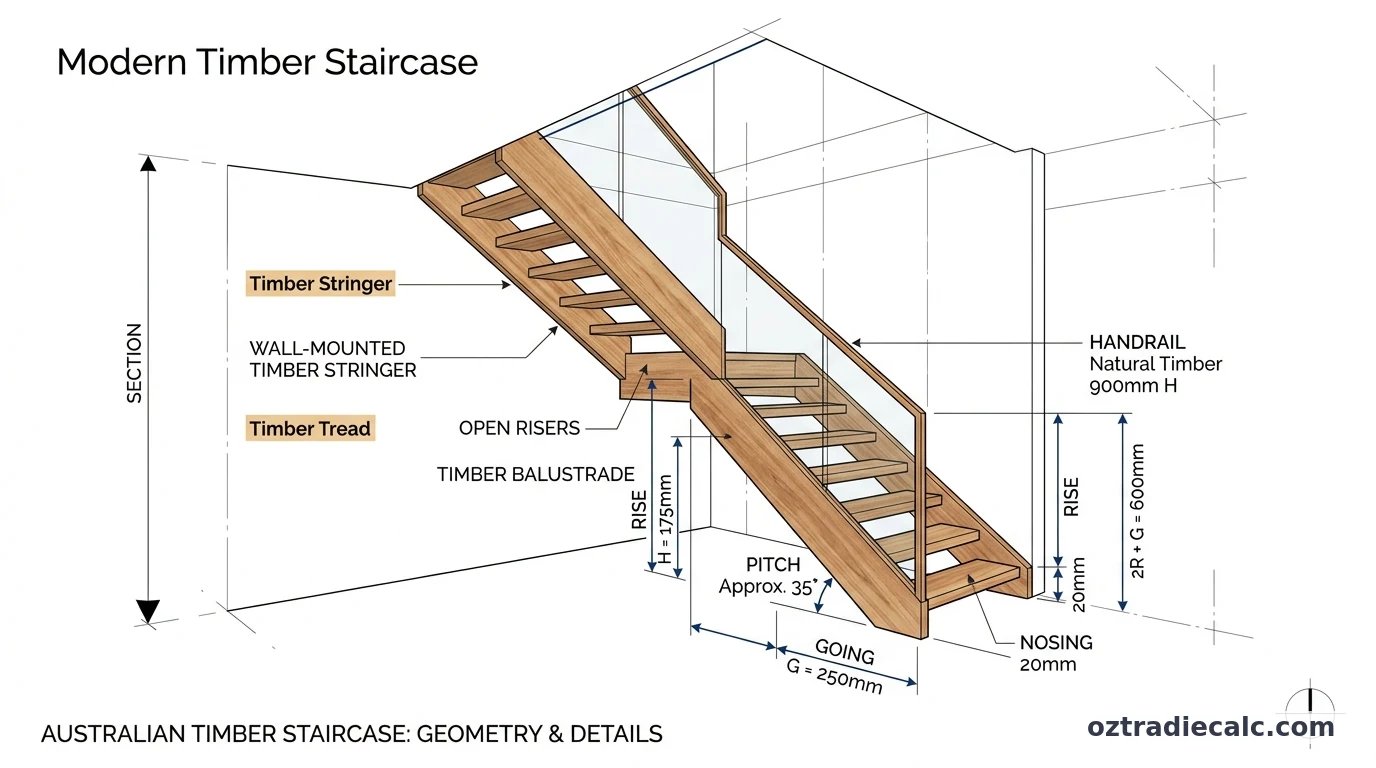
Under the National Construction Code (NCC 2022 Volume Two / ABCB Housing Provisions Part 11.2) and AS 1657, all domestic stairways in Australia must comply with strict geometric boundaries governed by the 2R + G stair formula. This guide walks through the exact math, dimensional limits, stringer layout rules, and certifier traps every chippy, builder, and owner-builder needs on site.
1. NCC 2022 Stair Dimensional Limits (Cheat Sheet)
In Australia, residential building standards (NCC Class 1 for houses and Class 10 for decks, patios, and sheds) establish clear legal boundaries for stair construction. Every stair flight must sit within these minimum and maximum thresholds to pass inspection.
| Stair Element / Dimension | NCC Minimum | NCC Maximum | Ideal Tradie Target | Critical Non-Compliance Trigger |
|---|---|---|---|---|
| Riser Height (R) | 115 mm | 190 mm | 165 – 180 mm | Exceeding 190 mm or dropping below 115 mm |
| Going Depth (G) | 240 mm | 355 mm | 250 – 280 mm | Less than 240 mm nosing-to-nosing |
| 2R + G Relationship | 550 mm | 700 mm | 600 – 630 mm | Value below 550 mm or above 700 mm |
| Stair Pitch Angle (θ) | 23.0° | 38.0° | 32.0° – 35.0° | Stair angle steeper than 38 degrees |
| Riser Variation (ΔR) | 0 mm | 5 mm | ≤ 2 mm | >5 mm between adjacent steps or >10 mm total |
| Max Risers per Flight | 2 risers | 18 risers | 10 – 14 risers | 19+ continuous steps without an intermediate landing |
| Minimum Headroom | 2,000 mm | No limit | 2,050+ mm | Vertical bulkhead clearance <2,000 mm from nosing line |
Note: For spiral stairs, winders, or commercial access stairways governed by AS 1428.1, additional geometric restrictions apply (such as minimum 200 mm going at the narrow point of a winder).
2. How the 2R + G Formula Works (Gait & Ergonomics)
The 2R + G rule is not arbitrary red tape—it is grounded in human locomotion physics. First documented by French architect François Blondel in 1675 and refined across centuries of building science, the formula reflects how the human body moves across horizontal versus vertical space.
An average adult's natural walking stride length on a flat surface is roughly 600 mm to 630 mm. Biomechanically, lifting your body weight vertically takes twice as much muscular effort as stepping forward horizontally. Therefore, two units of vertical rise (2 × R) plus one unit of horizontal going (1 × G) equals one natural stride.
Chippy’s Rule of Thumb: Aim for a 2R + G result between 600 mm and 630 mm. This sweet spot feels effortless to climb for children, adults, and the elderly alike. If your total lands at 555 mm, the stair feels awkwardly shallow and shuffling; if it hits 695 mm, it feels like climbing a steep ladder.
The Crucial Difference: Going (G) vs Tread Depth (TD)
One of the most frequent framing blunders occurs when apprentices confuse Going with Tread Depth:
- Going (G): The horizontal distance measured strictly from the front edge (nosing) of one tread to the front edge (nosing) of the tread directly above it. This is the exact number required by the NCC formula.
- Tread Depth (TD): The total physical width of the timber board you cut and screw down. It equals the Going plus the nosing overhang (TD = Going + Nosing).
- Nosing (N): The projection of the tread beyond the face of the riser below (typically
20 mm to 25 mm).
If you use standard 90×19 mm or 140×19 mm decking boards for your stair treads, calculate how many board widths and expansion gaps make up your total tread depth with our Decking Board Calculator.
3. Step-by-Step Practical Stair Calculation (Real Site Example)
Let’s run through a real-world calculation for an outdoor timber deck staircase connecting a raised verandah subfloor to a concrete ground pad.
Site Scenario & Measured Levels
Total Rise (Floor-to-Floor Height): 1,080 mm (Measured with a laser level from the finished deck surface to the concrete landing slab).
Stair Type: External timber stringer with closed treads.
Standard Target Riser: ~175 mm (comfortable domestic target).
Step 1: Calculate the Number of Risers
Divide the Total Rise by the ideal target riser (175 mm):
1080 mm ÷ 175 mm = 6.17 risers
Always round to the nearest whole number. In this case, round to 6 risers.
Now, calculate the exact riser height:
Exact Riser (R) = 1080 mm ÷ 6 = 180.0 mm
Result: 180 mm sits comfortably between the NCC minimum (115 mm) and maximum (190 mm).
Step 2: Determine Number of Goings & Choose Going (G)
On a standard stairway where the top step lands flush with the deck floor edge, the number of goings is always one less than the number of risers:
Number of Goings = 6 risers - 1 = 5 goings
Let’s select a standard residential going of 260 mm (allowing two 140mm decking boards with a 20mm nosing overhang).
Step 3: Test the 2R + G Compliance Formula
Substitute R = 180 mm and G = 260 mm into the NCC formula:
Result: 620 mm satisfies 550 mm ≤ 620 mm ≤ 700 mm. Perfectly compliant and ergonomically balanced.
Step 4: Calculate Total Run & Stair Pitch Angle
Calculate the horizontal space required on ground (Total Run):
Total Run = 5 goings × 260 mm = 1,300 mm (1.30 metres)
Calculate the pitch angle (θ):
Pitch Angle = arctan(Total Rise ÷ Total Run) = arctan(1080 ÷ 1300) = 34.7°
Result: 34.7° is well below the NCC 38.0° maximum pitch limit.
To run these numbers instantly on site and generate exact stringer notch dimensions for your timber order, test your project with our interactive Stair & Stringer Calculator.
4. Cutting Stair Stringers: Throat Depth & First Step Drop
Calculating the numbers on paper is straightforward; transferring them onto a heavy piece of 250×50 mm or 290×45 mm structural timber stringer is where costly mistakes happen.
1. Setting Up Your Framing Square (Stair Gauges)
Do not use a tape measure to mark step-by-step down a timber stringer. Cumulative pencil thickness errors will leave your bottom step 10 mm out of level. Instead, attach two brass stair gauges (stair buttons) to a steel framing square:
- Clamp one gauge on the tongue at exactly 180 mm (the Riser).
- Clamp the second gauge on the body/blade at exactly 260 mm (the Going).
- Slide the square along the top edge of the stringer, scribing each tread and riser consecutively down the board.
2. The "First Step Drop" (Bottom Riser Cutout Rule)
This is the single most common mistake made by first-time stair builders:
Crucial Cut: You MUST cut the bottom of the stringer off by the exact thickness of one tread board (e.g. minus 32 mm for a 32mm hardwood tread).
Why? Because when you install the lowest timber tread onto the bottom cutout, its thickness adds 32 mm to the first step. If you do not trim 32 mm off the bottom of the stringer timber before installing, your first step off the concrete pad will measure 180 + 32 = 212 mm (illegal!), while all steps above will measure 180 mm.
3. Minimum Stringer Throat Thickness
When you saw triangular notches out of a solid timber stringer to seat your treads, the remaining unbroken wood underneath the cutouts is called the Throat Depth (or Effective Web).
- Under Australian residential framing guidelines, the minimum effective throat depth must be at least 75 mm to 90 mm for un-notched structural support.
- For spans exceeding 2.4 metres, use 290×45 mm F17 hardwood or engineered LVL stringers, or install a centre support post to eliminate bounce and structural deflection.
- For sizing supporting beams and posts, check our Bearer & Joist Calculator and Timber Span Calculator.
5. Handrails, Landings & The 125mm Sphere Rule
Stair safety compliance extends beyond the stringer cuts. Certifiers inspect handrails, balusters, and open tread gaps with strict measurement tools.
The 125mm Sphere Rule (Open Treads & Balustrades)
Under NCC 2022 Volume Two, where a stairway is more than 1.0 metre above the ground or surface below:
- Any opening in a balustrade or between open tread risers must not allow a 125 mm diameter solid sphere to pass through under moderate pressure.
- If you build modern floating open-riser stairs, you must reduce the clear vertical gap between steps to less than 125 mm. If your riser is 180 mm and your tread board is 35 mm thick, the opening is
180 - 35 = 145 mm(non-compliant). You must fit a timber batten or partial riser lip underneath to reduce the opening below 125 mm. - To calculate compliant baluster and post spacing, use our Baluster Spacing Calculator.
Handrail & Balustrade Heights
- Along the Stair Flight: Handrails must sit at a minimum vertical height of 865 mm, measured vertically from the nosing pitch line to the top of the rail.
- On Flat Landings & Balconies: Where the fall to ground exceeds 1.0 m, balustrades must finish at a minimum height of 1,000 mm (1.0 metre) above the finished floor level.
- Non-Climbable Zone (NCZ): For stairways and balconies with a fall of 4.0 metres or more, horizontal rails or climbing footholds are prohibited between 150 mm and 760 mm from the floor.
Intermediate Landing Rules
- A continuous stair flight must not exceed 18 risers without an intermediate landing.
- The minimum length of an intermediate landing must be at least 750 mm (or equal to the stairway width, whichever is greater).
- Landings must be level, with a maximum allowable cross-fall of 1:50 for external surface water drainage.
6. Top 5 Building Certifier Inspection Failures & Fixes
Here are the five most common non-compliance issues recorded on Australian residential building sites during stair inspections:
| # | Common Inspection Failure | Root Cause on Site | How to Prevent / Fix It |
|---|---|---|---|
| 1 | Unequal First Step Height | Forgetting to subtract tread board thickness from the stringer foot. | Cut the stringer base by the exact tread thickness (Riser − Tread Thickness) before fixing. |
| 2 | Finished Floor Level (FFL) Omission | Measuring from bare concrete subfloor before 20mm tile screed or 19mm timber flooring is laid. | Always calculate Total Rise based on the finished surface level, not rough framing. |
| 3 | Consecutive Riser Variation >5mm | Marking cuts with a tape measure or using bowed, unseasoned wet timber. | Use a steel framing square with fixed brass stair gauges and kiln-dried engineered timber. |
| 4 | Open Riser Gap Breach (>125mm) | Installing thin 32mm treads on open-rise modern stairs without infill lips. | Fit a rebate stop or timber batten to the underside of each tread to restrict opening to ≤120mm. |
| 5 | Stair Pitch Exceeding 38.0° | Trying to squeeze a staircase into a tight hallway or short outdoor deck space. | Lengthen the going or introduce a 90° landing winder to extend the total available run. |
7. Chippy’s Pre-Handover Stair Inspection Checklist
Before calling the private building certifier or handing over the keys to the client, run through this quick on-site quality and compliance check:
- Stringer Level & Square: Lay a 1,200mm spirit level across both stringers at the bottom step, mid-flight, and top landing to ensure treads sit dead level without racking or twist.
- Tape Measure Nosing Audit: Measure every individual riser height from finished tread to finished tread. Verify that no two consecutive steps differ by more than 5mm, and the total flight variation is under 10mm.
- Finished Floor Level (FFL) Sign-off: Double-check that final floor finishes (such as 20mm tile screed or 19mm hardwood flooring) haven't altered the bottom riser height off the slab.
- 125mm Sphere Clearance: Pass a 125mm sphere gauge through all open riser gaps and baluster spaces. If the gauge passes through anywhere, install timber infill lips or intermediate balusters immediately.
- Top & Bottom Anchor Fixings: Confirm stringer tops are securely tied into the subfloor trimmer joist with structural framing brackets or heavy-duty joist hangers, and the stringer feet are bolted into concrete pads with galvanized post shoes to prevent timber rot.
- Slip-Resistance Nosing: Ensure external stair treads have compliant grooved nosing profiles or P3/P4 anti-slip coatings for wet weather compliance.
Ready to calculate stringer cut lines, board counts, and NCC compliance for your project? Use our free Stair & Stringer Calculator.